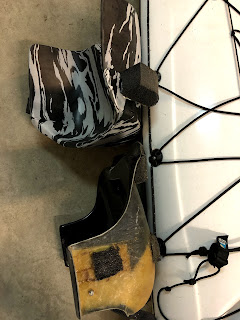
The control I get from this seat is great, the balance is perfect and the kayak is a joy to paddle in any conditions.
I have tried many different ideas to get comfortable. Different backbands, seat pads, cushions behind my lower back and even an inflated thermarest pad under my thighs. I tried carving a seat from minicell a few years ago but that was horrible. What to do?
I had read about the Bumfortable seat, made in New Zealand. I finally ordered one, but at $230 shipped I'm thinking this is it - if this doesn't fix it the kayak has to go.
It arrived very quickly from New Zealand, I was surprised how quickly it arrived.
The instructions call for cleaning your hull with alcohol and sanding it a bit. Easy enough. The instructions recommend gluing the seat to the hull with either "No More Nails" or Contact Cement.
In order to get the seat placement correct you have to determine where your sit bones land in the original seat by putting water on the original seat, and marking where the middle of the puddle is (as close as possible). Then you put the Bumfortable seat in the boat, put some water in it and try to match the middle of the puddles to where you measured before.
I took great pains to measure exactly where the seat would rest. There are water channels underneath it, so you want to glue where the seat makes contact. I tried lots of positions in the boat, keeping in mind that the amazing control I have in the boat has a lot to do with the overall design, especially where my butt rests!
I started with No More Nails ($10). I glued the seat to the hull, and left it overnight in my warm garage.
Next day I took the boat out for a paddle and about 5 seconds after I sat in the boat the seat came loose and slid to the back, It was also very unstable. I beached the kayak, moved the seat forward a bit, and gingerly paddled back to the parking.
I scraped the No More Nails off the bottom of the seat (it's very slippery, that was easy) and out of the boat. It came out quite easily.
Next was the Contact Cement (another $10). This is a bit trickier, as the bond is instant and there is apparently a right and wrong time to press the items together for gluing. So when I was ready, I applied glue to both the seat and the hull (cleaned up, of course). I waited about 15 minutes, then pressed the seat in.
I left it, and went for a paddle a day or two later. Once again, the seat peeled out when I was done!
The contact cement was a lot harder to remove from the hull. I had to buy Acetone ($13). Even with that, it was quite a chore to scrape out the cement.
It occurred to me (and I had read somewhere) that thigh support is critical in keeping the seat in place. I bought two yoga blocks ($20), as recommended by a member of a Facebook Kayaking group I'm in. I haven't used them yet. Meanwhile, I took the foam thigh supports off the OEM seat, and glued them to the Bumfortable. One stayed on, one didn't. I used screws and washers to hold that one on, with more glue.
Next, I tried what the manufacturer of the Bumfortable doesn't recommend. Velcro!
I bought a few boxes of 15lb 1" thick Velcro. I laid two strips on the hull, and put their matching halves on the seat.
I figured out that the only way to squeeze the seat into place is by placing paper over the bottom Velcro, sliding the seat on it, then pulling out the paper so the seat makes contact in the right place. This is powerful Velcro!
I took it for a paddle, and with the thigh support, the boat handles well, but for this test paddle I had placed the seat too far back. But it stayed in place, and I had better contact with the boat thanks to the thigh supports.
I think the seat is higher than the OEM seat, I should be more stable just sitting in the water. They say one can shave foam off the bottom, but that scares me. Once you take foam off, you can't replace it!
More to come, as I must perfect the thigh braces and fit the seat in eactly the right place. I'm thinking of taking the OEM seat out for a paddle, just to remember how the boat SHOULD feel!


No comments:
Post a Comment